


Tips and Tricks!
When submitting artwork for printing, following a few key tips and tricks can streamline the process and ensure the best possible results for your project.
Understand Bleed and Crop Marks
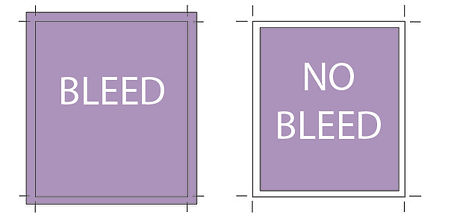
Bleed is a crucial aspect of print design that ensures your artwork extends beyond the edges of the final document, typically by around 3mm. This extension is essential for preventing white borders from appearing around your design when it's trimmed to its final size after printing.

Before Cutting
Colour and images must extend
beyond the edge of your artwork
To prevent unwanted white borders.
This is known as bleed.
During Cutting
Everything beyond the
solid line is cut off
ie. the bleed.
The Final Trimmed Product
In addition to bleed, crop marks are used to indicate where the document should be trimmed to achieve the desired size. These marks guide the cutting process, ensuring precise alignment and dimensions.


Add bleed and crop marks to your artwork files! Otherwise they are not “print ready” and risk not looking their best. We can easily add bleed and crop for you, just supply us your original artwork and relax! We will always advise before putting your work to print, and send you over a proof to make sure you are perfectly happy with your artwork

Use High-Quality Images
To maintain clarity and sharpness in your printed materials, use high-resolution images (usually 300 DPI) in your artwork. Low-resolution images can appear pixelated or blurry when printed.

Determining whether an image is high or low resolution isn't always straightforward. Despite looking good on your computer screen, an image's resolution can't be discerned solely from its appearance or file size. However, one reliable method is to open the image in an image editing program like Photoshop. Alternatively, most computers are equipped with basic editing programs that can assist in assessing an image's resolution. By utilizing these tools, you can accurately determine whether an image meets the criteria for high resolution.

Choose the Right Colour Mode
Ensure your artwork is in the appropriate colour mode for printing. For full-colour printing, use CMYK (cyan, magenta, yellow and black) colour mode rather than RGB (red, green, blue), which is more suitable for digital displays.

The main difference between RGB and CMYK colour modes lies in their applications. RGB is used for digital designs like web and TV files, while CMYK is employed for printed materials such as posters, stickers and business cards. RGB is optimized for emitting light, ideal for screens, while CMYK is tailored for absorbing light, making it suitable for print. Understanding this difference ensures designs are correctly formatted for their intended medium.
Check Fonts and Text
Embed or outline your fonts to prevent any issues with font compatibility. Also, ensure that all text is legible and properly aligned within your design.

Embedding fonts means including the font files within the document itself. This ensures that when the document is opened on another computer or sent to a printer, the necessary fonts are available for rendering the text accurately. However, not all fonts can be embedded due to licensing restrictions.
On the other hand, outlining fonts involves converting text into vector shapes. This ensures that the text is preserved exactly as it appears, even if the original font is not available. However, once text is outlined, it can no longer be edited as text, so it's important to finalize all text content before outlining.
Additionally, it's crucial to ensure that all text within your design is legible and properly aligned. This involves checking for readability by verifying that the font size, style, and color contrast adequately with the background. Proper alignment ensures that text elements are visually balanced within the overall design, enhancing its professional appearance.
By embedding or outlining fonts and ensuring legibility and alignment of text, you can minimize the risk of font-related issues and ensure that your printed materials accurately reflect your intended design.
Request a proof
Asking for a proof gives you the opportunity to review and make corrections before your work is sent to print. Ensuring that everything is perfect at this stage can save time, resources, and potential headaches later on in the printing process. Always take the time to carefully review the proof to catch any errors or inconsistencies before giving the final approval for printing.
